This Mac tip is provided by Mark Greentree and was originally posted on Mark’s blog – Everyday Mac Support. For more of Mark’s tips visit his site, follow him on Twitter, or browse his archive of posts here.
How To: Saved Versions In Mac OS X Lion – How To View And Restore
Recently, I wrote a review for the CrashPlan+ Service for MyMac.com, hence this review is perfectly suited to take a look at how versions works and also how to restore to a previous version of the file used.
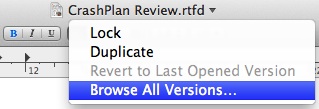
In order to access the versions area simply click on the title bar of your document as shown below:

As you can see “Browse All Versions” is selected above and by clicking this you will be taken into the versions view as seen at the beginning of this post.
You may also have noticed in the image above that you have a greyed out “Revert To Last Opened Version”. This will become an active button when changes to have been made to the existing document and the word “Edited” is located next to the title. Selecting this will allow users to make changes for a single print for example and then revert to the last opened version.
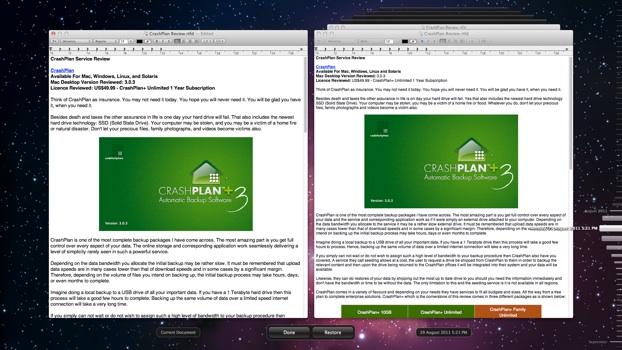
If you are familiar with TimeMachine you would note that the versions overview window is very similar.
You will see the “Current Document” located on the left hand side whilst the previous version and all other versions preceding it will be located on the right hand side of your display.
On the right hand side of the display you will notice a series of bars. These bars indicate the different versions and how far they go back. For instance I could go back to Monday, 29th August 2011 by simply clicking on the date when presented in the right hand navigation bar.

You will notice on the right hand side that we are shown a different version of the file in the state it was in on that selected date.
Should you wish to restore that document all you need to do is select the “Restore” button located at the bottom of the screen.
Once restored you will be able to continue using the restored version of the document making relevant changes along the way. If the file was opened in a smaller window in the previous version that will also be presented as well which is a nice touch.
Just because you have restored a file doesn’t mean that you can no longer access the previous version. At anytime you can go back to the versions view and restore the original document.
I have no doubt that many users will get great value out of the new versioning feature in Mac OS X Lion.
For more helpful tips, check out our full collection of tutorials by visiting our How-To category!


