This Mac tip is provided by Mark Greentree and was originally posted on Mark’s blog – Everyday Mac Support. For more of Mark’s tips visit his site, follow him on Twitter, or browse his archive of posts here.
How To: iTunes In The Cloud – How To Use It!
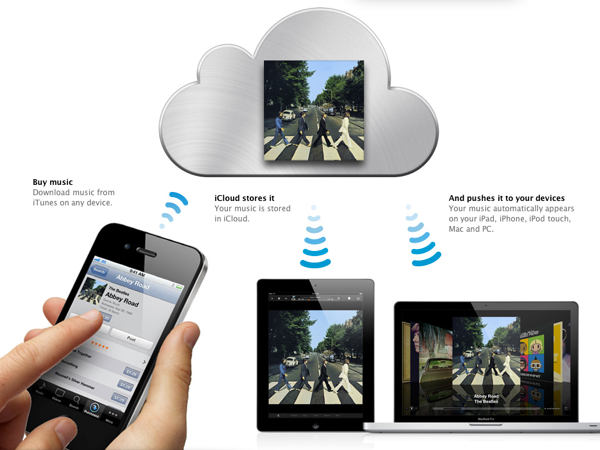
iTunes In The Cloud Beta is available for everyone to use and is live. Please note however that the Music option of this service is only currently available to users with US iTunes Accounts. Outside of the US only Apps and Books are currently available on this service.
In essence it is a basic service from the user perspective which allows new purchases to automatically sync to all your devices if this is your preference and purchased music prior to the iCloud beta launch will be available on all your devices at a click of the button.
Simply purchase a song on your Mac, iPad or iPhone and the song in question will be sync’ed to all your devices. Without the user needing to do anything once the settings of your choosing are in place.
Firstly, you can have it set up so you need to manually download the content. This is the default option.
With this option left this way you notice that you will receive the following message on each of your devices once a purchase has been made on another device connected to your account:
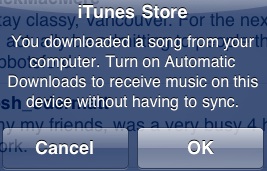
Or your can set up your device to automatically download the content once purchased.
Please note that music purchased prior to this option being available will need to be manually updated on your device. As will music purchased when you have automatic downloading turned off.
However, once you have turned on automatic syncing and leave it in this mode then your purchases from then on will download without delay.
So how do you make this work?
Well, access is automatically activated on your iOS devices as it is simply an additional tab located in the iTunes Store on the device.
Simply open the iTunes Store on your device and click on the new tab at the bottom of the screen titled ‘Purchased’ as shown below:
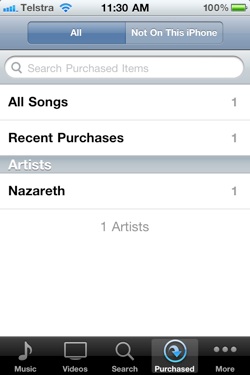
Now you will see that you have two tabs one is for all content which has been purchased on your account and the other is for content which is simply not located on the device you are currently working on.
Simply select the artist your wish to add and you will proceed to the next window as shown below:
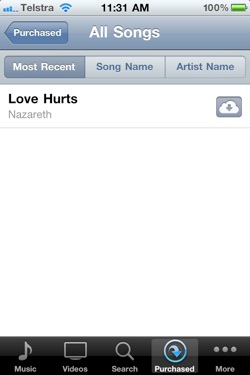
Should you want this song to be playable on your device as well as perhaps your computer that you purchased the song from then simply click the cloud button next to the song as shown above and it will start downloading as can be seen below:
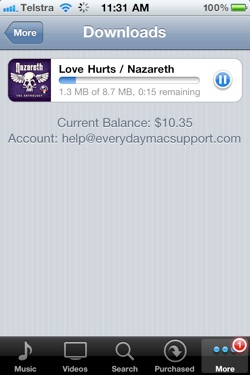
Once the download has completed you will be able to play the song in question by clicking the purchased arrow which will appear in the top right hand of the screen or by simply going to the iPod app.
Even if you decide to delete the song when connected to your iTunes library then you can at anytime repeat this process and the song will be re-downloaded to your device at no additional cost.
This example has been shown on the iPhone however it works exactly the same on the iPad and iPod Touch. This example thus far has also been presented with the view that you purchased the content on your computer for example and not your iOS device. It also presents the option of how music purchased prior to the iCloud activation works with regards to manual downloading. Hence, now I will run though what you need to do to make sure that your computer and devices are automatically syncing.
If you have been a longtime user of iOS devices and a Mac you would know that when you connect the devices to your Mac that a sync will occur at which time will then copy all the purchased content from the device to your iTunes library. However, what if you don’t sync your device very often? How can the iTunes In The Cloud service help get your content from your device to your Mac?
Well unlike the iOS device there are a couple of additional steps to the process.
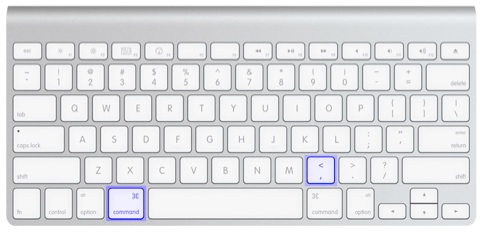
Firstly, you will need to make sure that you have iTunes 10.3 installed on your Mac. Then your will need to proceed to your iTunes preferences by navigating to iTunes-Preferences from the menu bar or by pressing Command-, (Comma) as shown below on your keyboard:
Then you will need to proceed to the Store tab as shown below:
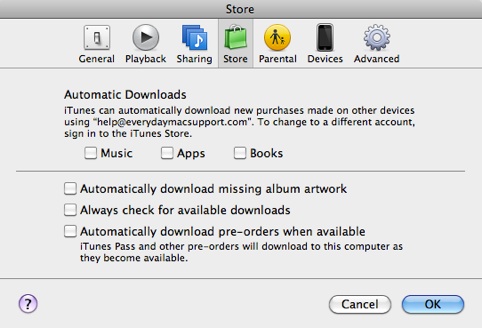
If you have been in this area before you will notice that it has now changed to reflect the new service offering.
You will notice at the top of the window you have Automatic Downloads. By default these are all deactivated. However, all you need to do is simply select Music, Apps or Books and upon purchasing on an iOS device the item in question will then be automatically downloaded to your iTunes library the next time you open iTunes. Should you have iTunes open it will start downloading on your computer before it has even finished downloading on your device.
Similar settings can be found on your iOS device. Simply proceed to the settings for your device and then go to the Store option tab. Doing so will present a window which looks like this:
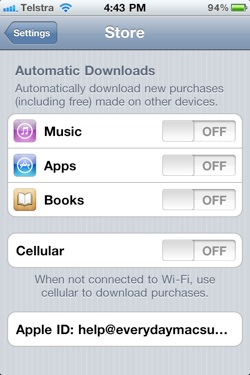
By default all options are turned off.
If you want your device to be in sync when you make a purchase simply turn the feature on for each area you wish to sync.
You will notice that on the iPhone and iPad with 3G you also have a button which says Cellular. Personally, I would recommend you leave this turned off unless you have a very good and most probably unlimited data allowance on your contract. Remember, some of these files especially apps can be significant in size and will consume your data at an alarming rate.
It is however a convenient function should you be aware of the cost of Cellular data.
Please also note that not all apps can be automatically downloaded. The case and example is iPad apps can not be downloaded and installed on your iPhone for example. However, iPhone apps can be automatically downloaded and installed on your iPad.
So will I personally use this service? Yes…just not in Cellular mode.
iTunes Match will certainly be a interesting and welcome addition to this service when launched giving users the ability to also sync content from their own ripped CD collections to the iCloud service and have that music available on any device without the need to connect their devices to their computer.
Remember this service is still in the Beta phase and as such problems may occur.
For more helpful tips, check out our full collection of tutorials by visiting our How-To category!

